X-MAX Fender Flare Instructions


Tools Required:
- 10mm and 11mm wrenches (recommended: ratcheting end wrench)
- Pliers
- Phillips Screwdriver
- Permanent marker and/or small right-angle pick
- Razor blade/box cutter
- Drill & 3/8" bit (recommended: step-up drill bit)
- Safety glasses
- Angle grinder and/or reciprocating saw
- Grinding wheel, or metal file
- Hammer
- Installation of this product requires some welding
Recommended
- Sandpaper, sanding block and/or electric sander
- Body filler
- Waterproof caulking, or metal filler
- Masking tape
- Spray can of rubberized undercoating
Notice
We recommend waiting to paint the X-Max Fender Flares until after they have all been fitted to the body, because the most accurate fit may require some sanding of the flares. The flares in these instructions may appear to be painted but they are not. We also recommend washing your vehicle thoroughly (including the wheel wells) before starting this installation.
Front Fender Flares
1. Remove stock fender flares (10mm wrench), brackets, and rubber fender liners entirely, and wipe the fender areas on the body of the Jeep clean with a rag.

Figure 1
2. Hold the X-Max Fender Flare in place on the body—having two people for this portion is very helpful. If you do not have someone who can assist you, a few strips of masking tape may do the trick.

Figure 2 - Front Passenger Fender
3. With the flare in place, use a right-angle pick or a permanent marker to mark on the body where the bolts touch and will ultimately end up. Lay the flare to the side. **SUGGESTION: The washer fluid box is just inside the engine compartment on the driver's side of the vehicle (you may have noticed the seemingly odd bolt placement on your front driver's side flare.) We recommend you temporarily remove the washer fluid box before you start drilling through the body. This is not a necessary step, though it is highly recommended. If you choose to leave the box there, be careful not to drill too far and put a hole in the box.

Figure 3
4. Using the marks made in the previous step, drill 3/8” holes at each mark. We recommend using a step-up drill bit. If you don’t have one, drill small pilot holes first, then use the 3/8” drill bit.
5. Place the X-Max Fender Flare on the body again, inserting the bolts into the holes to check the fit. Where the fender flare lays over any plastic trim on the body, use a pencil or marker to mark where the edge of the flare will go. Use a box cutter to cut away the plastic, so the flare can sit flush against the body. **You can also choose to remove the plastic trim by pulling it away from the body starting at one end and working your way to the other. If there is still adhesive residue on the body of the vehicle you can you use an eraser wheel and drill to buff it away. BE CAREFUL NOT TO TAKE OFF THE CLEAR COAT OF PAINT.

Figure 4
6. If a bolt or two does not match up perfectly and the flare won’t go on, don’t worry. Just drill that hole a little wider, until all the bolts fit at once.
7. The flares should now fit comfortably against the vehicle, and the flare will hang on the vehicle by itself.
8. With the front fender flare on, use your right-angle pick or permanent marker to mark where the underside of the flare brushes/contacts the body. Take the flare off again.

Figure 5 - Making the scribe mark on fornt passenger's side fender
9. Put the appropriate safety equipment on (i.e. glasses, gloves, etc.). Using your angle grinder or reciprocating saw cut away the body, following the scribe line made in Step 8.

Figure 6
10. You will now want to smooth the just cut edge as it will now be very sharp. (We recommend using an electric sander.)
11. At the top of the front wheel wells is a long metal tab that used to hold the rubber fender liner in place. Remove this tab by either cutting it off or grinding the rivet off and then pulling the tab off of the vehicle.

Figure 7
12. If you have chosen to do the optional (but HIGHLY RECOMMENDED) Exact Shaping, leave your fenders off for the time being and move to the Rear Fender Flares portion of these instructions. If you have chosen NOT to do the option Exact Shaping you may place your fender flare back onto the vehicle. See Steps 43-49 for instructions on how to do the final attachment of the fender.
13. Repeat this process (Steps 1-12) for both the passenger and driver front fenders.
Exact Shaping (optional)
At this point, you might see areas where the fit is not exact, and you’d like to improve it. You may need to sand away some of the flare, or build it up using a body filler, such as Bondo©, but we recommend doing this later, after all X-Max Fender Flare pieces are fitted to the Jeep. It will be easier to do all the Bondo at once. More details on this later.
Rear Fender Flares - Body
14. On the inside of your Jeep, remove the plastic panels lining the sides of the trunk area (Interior Quarter Panel pieces). Also, remove the sound deadening bags from the bottom of the panel. They are located between the outer and inner sheet metal of the quarter panel in the bottom portion behind the wheel well.
15. Remove the stock rear bumperettes entirely.

Figure 8 - Passenger side bumperette being removed
16. Use a cutting wheel to carefully cut off the front portion of the bracket, just in front of the middle tab. Follow the example cut line in Figure 9. You will then have to either grind or drill through the spot weld on the third tab (tab closest to the front of the vehicle), to release it from the body.

Figure 9
17. Hold the rear body portion of the X-Max flare in place. The edge of the fender flare should sit flush against the edge of the door jamb (it should not stick past the jamb). The top edge of the flare will sit along the lower of the two body lines. Having two people for this portion is very helpful.

Figure 10 - Driver side fender flare at door jamb
**NOTICE: When placing the driver’s side fender flare make sure to not cover the gas tank lid. See Figures 11 & 12 for an example.

Figure 11

Figure 12
18. With the flare in place, use a right-angle pick or a permanent marker to mark on the body where the bolts touch and will ultimately end up. Lay the flare to the side.
19. Using the marks made in the previous step, drill 3/8” holes at each mark.
20. Place the X-Max Fender Flare on the body again, inserting the bolts into the holes to check the fit. If a bolt or two does not match up perfectly and the flare won’t go on, don’t worry. Just drill that hole a little wider, until all the bolts fit at once.
21. The flares should now fit comfortably against the vehicle, and the flare will hang on the vehicle by itself.
22. With the rear body fender flare on, use your permanent marker or scribe to mark where the underside of the flare contacts the body. Temporarily leave fender on, it will be needed when lining up the door flare.

23. Repeat this process for both the driver and passenger side rear body flares.
CONTINUE ON TO THE REAR FENDER FLARES – DOOR INSTRUCTIONS
Rear Fender Flares - Door
24. Open the rear door, and use a screwdriver to remove the 3 screw holding the panel on. Then carefully, working your way around the edge, pry the panel clips free from the door. BE VERY CAREFUL, YOU DO NOT WANT TO BEND THESE RODS: while still holding the panel close to the door, reach behind and unplug the wires for the door lock and window. Then using a small screwdriver, gently pry the plastic clips away from the thin metal rods for the door latch & lock mechanism. REMEMBER WHERE THE RODS GO. With the rods off of the panel piece you can now set it aside. Starting from the top, outer corner (by where the rods are sticking through) carefully pull the liner way from the door. DO NOT REMOVE COMPLETELY, you only need to expose about half of the door. This will give you access to the interior of the door.

Figure 13 - Shows passenger side door after panel has been removed and liner has been partially pulled away.
25. Hold the rear door portion of the X-Max flare in place, so that the top of the flare lines up with the outward slant of the body line, just below the handle. The vertical edge of the flare should sit flush with the edge of the door. Make sure the door flare and body flare line up and are level. See Figure 14 and Figure 15 for references. **The bottom of the flare will extend past the bottom of the door. That’s normal. (No cutting required here.)

Figure 14 - Rear driver side door and body flares.

Figure 15 - Driver side close up of the door and body flare pieces.
26. With the flare in place, use a right-angle pick or a permanent marker to mark on the body where the bolts touch and will ultimately end up. Lay the flare to the side.
27. Using the marks made in the previous step, drill 3/8” holes at each mark. Be careful not to drill through the door, and into the door jamb. We recommend drilling the holes with the door open.

Figure 16
At this point it may help to explain what the plan is. Unlike the front fender, the rear fender consists of two pieces of metal—an inner fender and an outer fender—that are pinch welded together by the factory. You’re going to separate the two pieces, and using a welder re-attach them later on, for stability. The method we outline here makes the most of the existing metal, so you don’t have to add sheet metal. You’re going to cut away some of the outer fender, then cut and bend the inner fender up to meet the new edge of the outer fender. If you have any questions please feel free to contact us at NotchCustoms.com or (801) 785-1671
Trimming
28. Continuing the scribe line made in Step 22, mark about 1/4”-3/8” below the door jamb marking the line all the way to the bottom of the pinch seam. (See Figure 17)
29. Cut the outer fender along the line you marked. Make sure you only cut through the outer fender wall. When you come to the portion of the fender that extends underneath the door, cutting along the line (3/8” below the bottom of the jamb) may get you close to the edge of the door opening. That’s fine, just stay below the edge.

Figure 17 - APPROXIMATE trim line/scribe line for rear wheel well (Passenger side shown)

Figure 18 - Cutting through the outer fender wall along scribe line
30. On the lower portion of the fender that you just cut, there are a series of pinch welds. These welds and some small adhesive are what are holding the outer piece to the inner. Cut vertical slits up into the metal, through the center of each of the pinch welds. You will now be cutting through both the “outer” and “inner” fender sheets. However, do NOT cut past your initial horizontal cut. See Figure 19.

Figure 19 - Cutting from edge to edge through EACH pinch weld.
31. Use a pair of pliers to pull the outer fender pieces off, leaving only the inner fender below the cut.

Figure 20 - Driver side fender, partial outer fender piece removal

Figure 21
32. Between the inner and outer fender, and the front and back of the wheel well, cut out a long triangle notch, so that you can pound the inner fender outward, to give the wheel more clearance. This will also help make the inner fender meet the new edge of the outer fender. (See Figure 22 and Figure 23)

Figure 22

Figure 23
Welding
Trust us on this one… before welding, we recommend removing your battery terminals, as well as the bench portion of your back seat.
33. Buff the paint off the new edge of the outer fender AND buff the surface of the inner fender where it meets the edge of the outer fender, to get a good weld.
34. Use a hammer to bend and shape the inner fender, giving your tire more clearance. Make sure the edge of the inner fender meets the new edge of the outer fender, so that you can weld the two together.
35. Prepare the welder, make sure the battery is disconnected, and that all fire hazards have been removed for the inside of the fender (i.e. sound bags).
36. DO NOT weld the entire edge of the inner fender to the outer fender—this will distort the body. Instead, weld two tacks on each “tab” of the inner fender, to attach it to the outer fender. Use a hammer to push each tab up to meet the edge of the body and place the two tacks. Then repeat for each succeeding tab.

Figure 24 - Rear passenger side after welding and excess metal has been trimmed.
37. After each tab has been successfully tacked into place, cut off any extra metal from the tabs. Be careful not to cut the tacks, thus losing your weld. Use a grinding wheel to clean up any rough edges or parts of the metal “tabs” sticking out too far. Make sure not to grind through your weld.
**IF YOU HAVE CHOSEN NOT TO DO THE EXACT SHAPING PLEASE SKIP TO STEP 43
Exact Shaping (optional, but highly recommended)
OK, now is the time to sand or Bondo the flares, if you want to get the most exact fit.
38. You will need to set each flare back on the vehicle. Look at the edge of the flare and determine if an area of the edge needs to be sanded down for a closer fit. Use a sanding block or electric sander to gradually sand away the fiberglass edge on the flare, where needed. DO THIS FOR EACH FLARE.
39. Tape an area about 3” above and 2” below the upper edge of the flare. We recommend using wide painter’s tape for this. (See Figure 25 for a visual, the tape sits about 2” below this edge of flare). Make sure to smooth the tape against the body the best you can. You will want to make sure that the body lines are crisp. Make sure you don’t cover your mounting holes.

Figure 25
40. Replace the flare, and temporarily secure the flare to the body with the provided hardware. You will want it to be as close to the final fitting as possible. **We suggest you repeat steps 39 and 40, so that you can do all the body filler at once.
41. With the flare now securely in place mix the body filler and fill in any gaps. Push the body filler into the gaps and then allow some of the filler to sit above the top the flare. It is easier to sand away extra filler than to add more. Leave fender flare in place until the filler is rigid, and the pull the flare away from the tape. The body filler should stick to the fiberglass on the flare, but pull away from the masking tape without much difficulty.

Figure 26
42. Sand any uneven spots on the body filler with a sanding block. Once the shaping is done, we recommend you leave the flares off until they’re painted, but whenever you bolt them on, DO NOT over-tighten the nuts! DO NOT use an impact wrench!
38.Sand any uneven spots on the body filler with a sanding block, to get a smooth surface and smooth edges. Remove the masking tape from the Jeep. Once the shaping is done, we recommend you leave the flares off until they’re painted, but whenever it is you bolt them on,
Sealing, Painting, and Mounting
43. Use a waterproof caulking or metal filler (like USC all-metal©) to fill in any slits or gaps in the wheel wells. Allow to cure. Sand until desired finish.

Figure 27
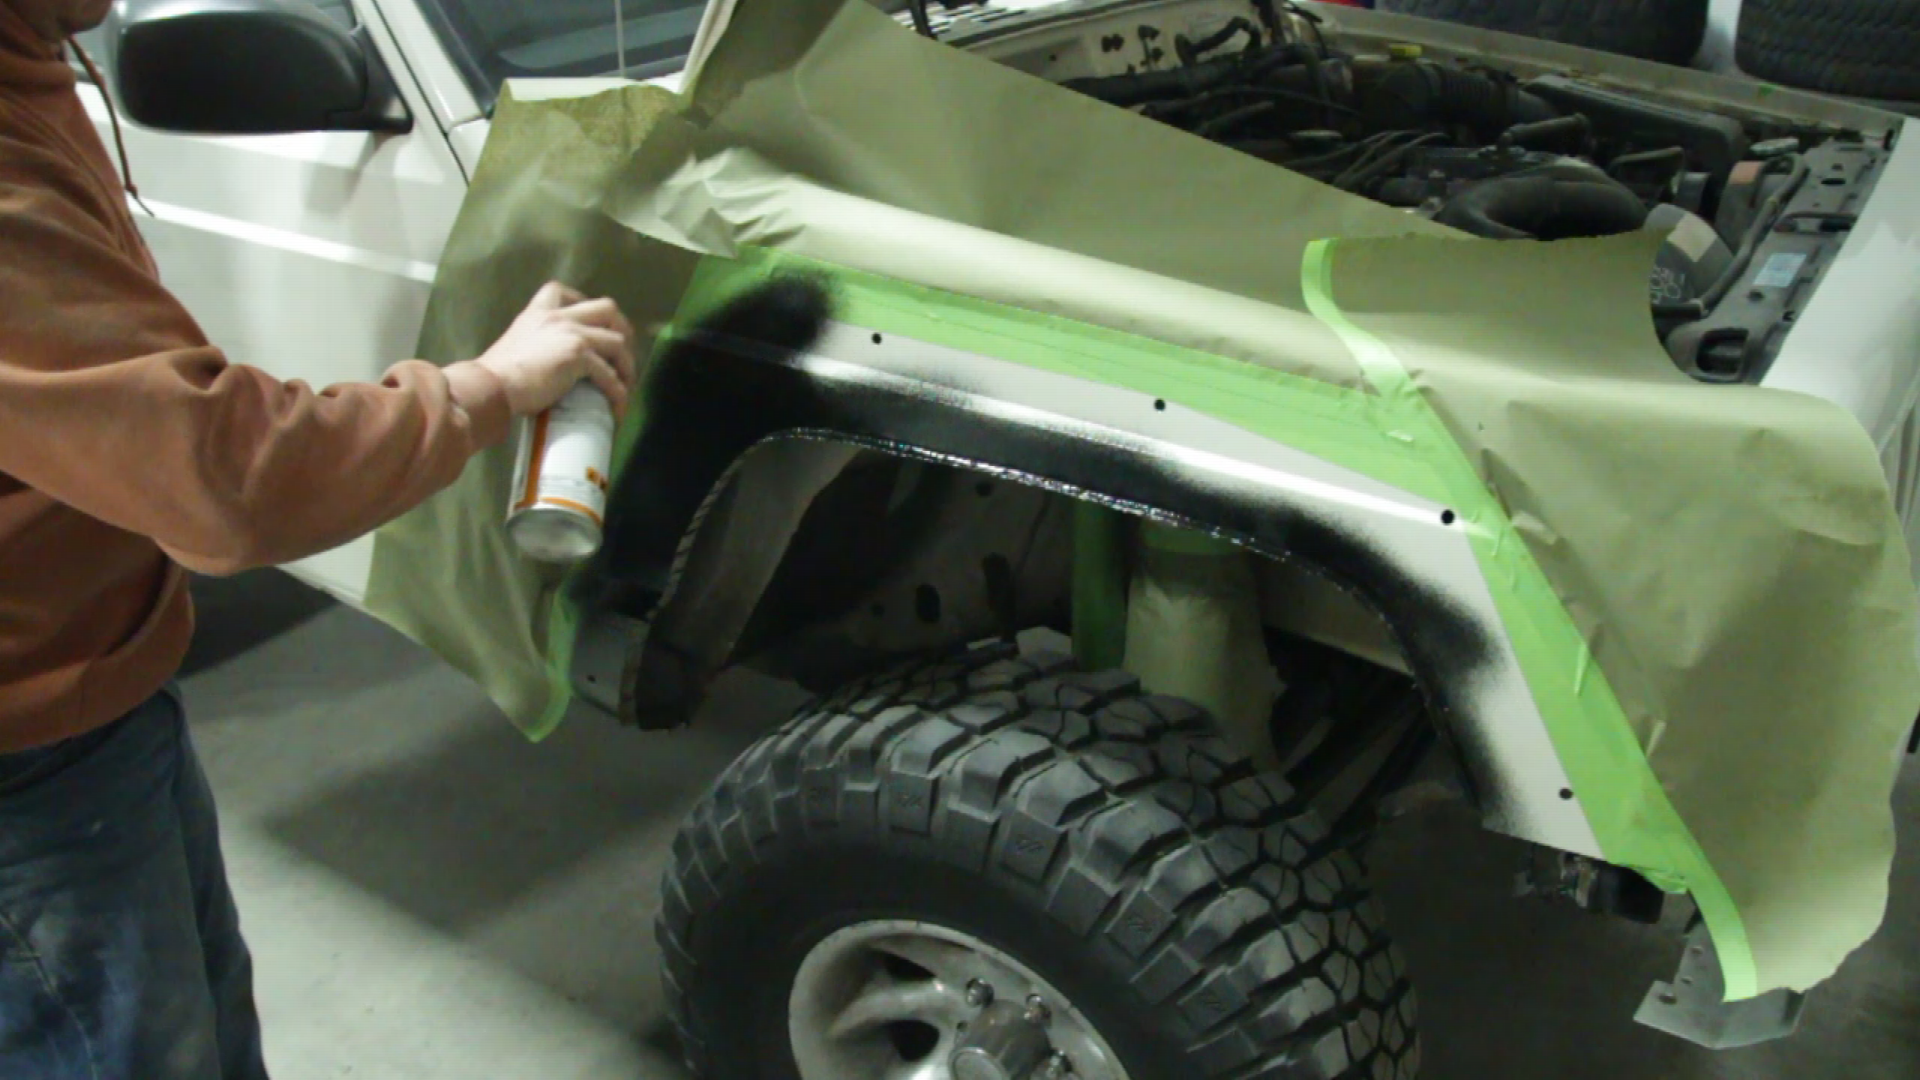
44. Tape off and cover your vehicle, tires, shocks, springs, etc., leaving the edge of the fender exposed. We suggest taping just above the bolt holes so that they get coated and help to prevent rusting.
45. Use a spray can of rubberized undercoating and apply a layer on the edge of the fender, and the inside of the wheel well, to protect the metal from corrosion.
46. If you are painting the X-Max Fender Flares yourself, sand the entire outside with 220-grit sandpaper. Making sure the Bondo is smooth and flush to the surface of the flare.
47. Paint or cover your X-Max Fender Flares as you wish. They do great with truck-bed lining too.
48. Mount your fender flares, using the rubber washers, washers, and nylon lock nuts included with your X-Max Fender Flares (11mm wrench). (Rubber washer goes against the body then metal washer.) Again, DO NOT over-tighten the nuts! As you tighten the nuts, try to spin the washer with your fingers. Once the washer is snug, and you cannot spin it by hand, the nylon locking nuts will hold securely. Over-tightening may warp your body.
49. Replace your door panels and trunk panels.


Sweet! Now send us YOUR photos!
Tell your buddy to get some pictures of you with your new X-Max Fender Flares, and send them to us at: info@notchcustoms.com. We want to see your build, and you may end up featured on our website!
Any comments or suggestions?
Any comments or suggestions? We’d love to keep improving our products and instructions for future customers. Send us a message at info@notchcustoms.com or visit www.NotchCustoms.com